


Saving and Moving Your Notes
Think of your notes as digital sticky notes. Sometimes you need to save these sticky notes to your computer for backup, or move them from one class or study group to another. This guide shows you how to do that using the Annotator app.
What Notes Can You Export?
You have the power to save any notes you can see. This includes:
-
Your Private Notes: Annotations and highlights only you can see.
-
Notes in Groups: Any notes shared in groups you belong to, whether they are Public, Private study groups, or groups connected to your online learning system.
Once you save your notes (export them), you can then load them back into any other group within the Annotator apps (import them).
Part 1: Exporting Your Annotations (Saving Your Notes)
Exporting is the process of saving a copy of your annotations from a document onto your personal computer.
Step 1: Go to Your Document and Group
First, go to the web page, PDF, or assignment document that has the notes you want to save. Make sure you activate the Annotator tool, and then select the specific Group whose notes you wish to export from the Group selection dropdown menu.
Step 2: Find the Export Option
Look for the Share button (it often looks like an arrow) at the top of the Annotator Sidebar.

Annotator Share Button
Clicking the Share button will show three options: Share, Export, and Import. Choose “Export”.

Annotator Export Options
Step 3: Choose Whose Notes to Save
The export tool will usually offer to save only your own annotations. If you want to save notes made by other members of the group, click the small dropdown menu. You will see a list of users, and a number in parentheses next to their name showing exactly how many notes they have that will be saved.
Step 4: Choose Your File Type (This is important!)
Before you save the file, you must choose a file format. You have several options, but one is key for moving notes between groups:
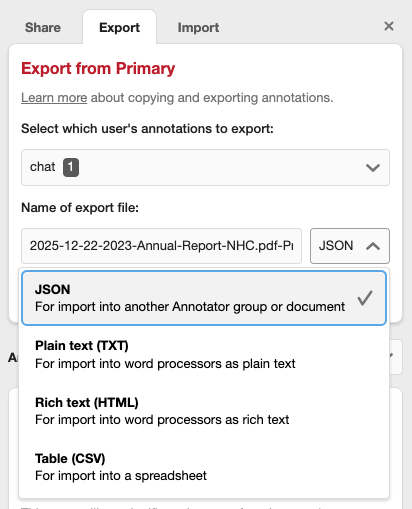
Annotator Export Options Supported Formats
-
JSON (Recommended for Re-Import): This is the most important format. If your plan is to load these notes back into a different Annotator group later on, you must choose JSON. This format keeps all the special coding and linking information required for the app to recognize them as live annotations.
-
Plain Text (TXT): Best for simply reading your notes in a basic text editor or word processor. It strips out all formatting.
-
Table (CSV): Best for viewing your notes in a spreadsheet program (like Excel or Google Sheets) to sort or analyze them.
-
Rich Text (HTML): A good option for pasting your notes into a word processor to keep basic formatting (like bold or links).
Step 5: Name and Save the File
You can click to change the name of the file before you save it. Once you are ready, you can choose:
-
“Export”: This will save the notes as a file that will download to your computer’s Downloads folder.
-
“Copy to clipboard”: This copies the notes data so you can immediately paste it into another document or program on your computer.
Remember: Only the JSON file type can be used for loading notes into other groups. All other types are just for saving a permanent record for yourself.
Part 2: Importing Annotations (Moving Your Notes)
Importing is the process of loading notes from a saved JSON file on your computer into a new Annotator group.
Annotator Import Options
Important Rules Before You Import:
-
The New Author is You: Any annotations you import will appear as if you wrote them, even if the original author was someone else. The app marks the importer as the creator of the notes.
-
No Replies (for now): You can successfully import the main “top-level” notes and any “Page Notes” (general notes at the top of the sidebar), but any notes that were replies to another comment will not be included in the import.
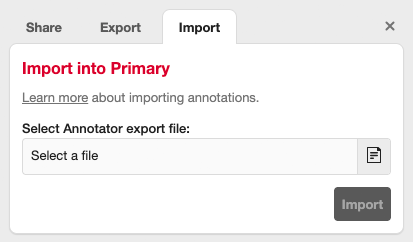
Step 1: Start the Import Process
Under the same Sharing menu (by clicking the Share button), select the “Import” option.

Annotator Import JSON File
Step 2: Choose Your File
Click on “Choose File” and locate the JSON file you previously saved on your computer.
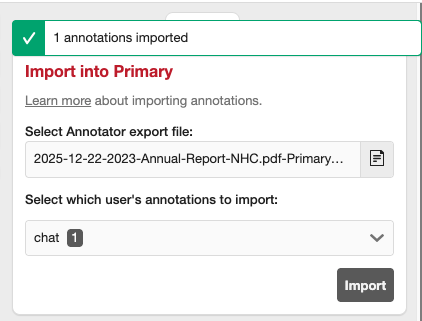
Once the file is selected, you can use the dropdown menu to choose which user’s annotations from the file you want to import. The number of notes for that user will be displayed next to their name.
Step 3: Finish the Import
Click the “Import” button to add the notes to your current Group.
Part 3: Import Messages (What the App Tells You)
After importing, the Annotator app will show you a quick message:
-
Successful Import: If everything works, you will see a “Success” message telling you exactly how many annotations were added to the new group.
Annotator Import JSON File Success
-
Duplicate Notes Skipped: If you try to import notes that are already in the group (perhaps you tried to import the same file twice), the app is smart enough to recognize them. It will give you a message like “X duplicates skipped” to let you know that the existing notes were left alone and only the new ones were added.
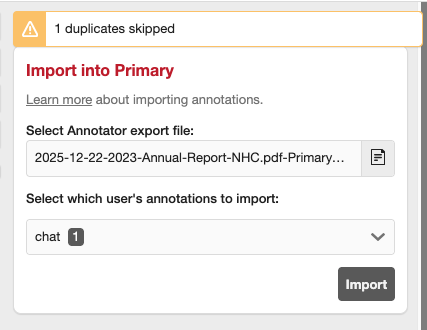
Annotator Import JSON File Duplicates Error